
This is a tutorial for both X-Box users and PC. I do not know how to do it for PS3 but I imagine its the same as the only difference is in the beginning. For X-Box and PS3 just move a save and its backup to a storage device that can be plugged into your computer, the rest is the same for all platforms. If the text description is not sufficient, I have included a video of which I believe does a good job of explaining everything I cover,
materials list
Materials:
External Hardrive/Flash Drive with at least 2GB
Computer
Programs:
Horizon
Gobbed
External Hardrive/Flash Drive with at least 2GB
Computer
Programs:
Horizon
Gobbed
extracting a .sav file
-First open Horizon.
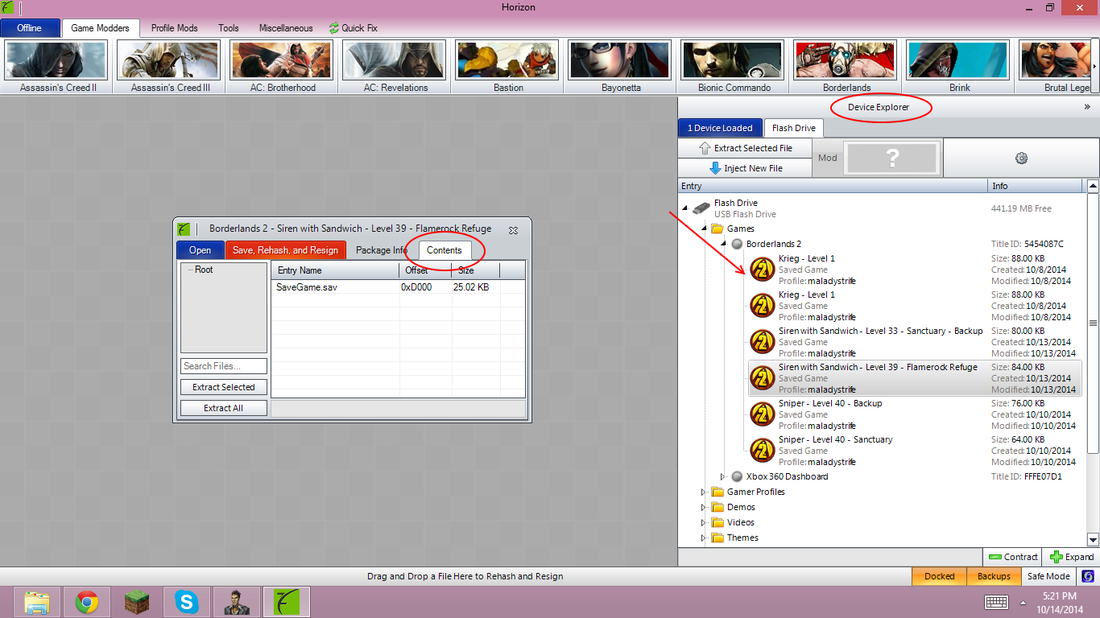
-Then open the device explorer on the left if it's not already open.
-Double click or drag the file you wish to edit to the left side of Horizon in the grey area.
-After double clicking you should see the menu open, go to contents, right click, and hit "Extract". Extract it to someplace where you can keep track of it, I recommend your desktop.
Opening a .sav
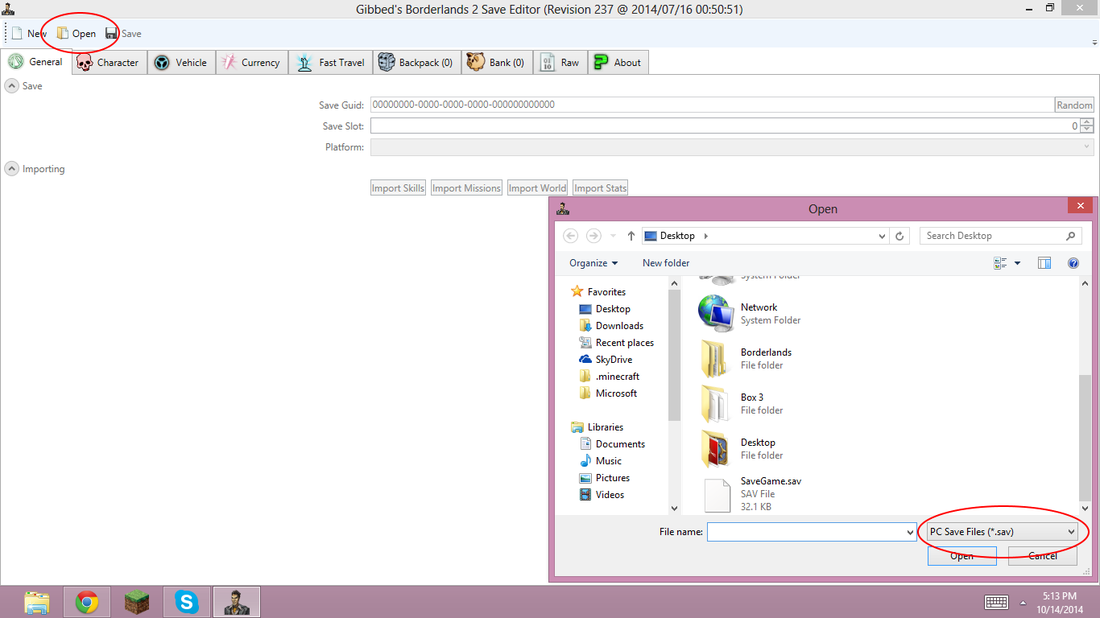
-After extracting your file, open up Gibbed.
-In the Gibbed Editor, click on "Open" and choose your .sav from earlier. Be sure its in the proper format, either PS3, X-Box, or PC. If this is not right the file will read: "Failed to load save; Invalid or unsupported version"
-In the Gibbed Editor, click on "Open" and choose your .sav from earlier. Be sure its in the proper format, either PS3, X-Box, or PC. If this is not right the file will read: "Failed to load save; Invalid or unsupported version"
Changing CHARACTER traits
-Before we get to adding weapons and such, we can modify parts of a character such as level, places they have traveled to, etc.
-We dont need to mess with anything on the "General" tab, none of it matters for what we plan on doing.
-In the "Character" section, you can change level, Skill Points, OP levels, skins and more.
-If you wish to change a level be sure to hit the "Sync" button on the XP as you will revert to your current level if you dont. Adding Skill Points will not work if they do not add you your characters normal amount from old patches. If you wish to add skill points, either go into the raw tab and add them manually or clear your system updated for Borderlands 2 and go from there.
-Changing a skin/head can be done even if you do not have that skin, DLC or not. Although, if you swap skins to another one and you try to switch back, you wont be able to without owning that head/skin.
-The "Vehicle" section means little to us, all it lets you do is change your default skins for the vehicle of choice.
-In the "Currency" tab we can change, well the currencies of a character.
-Feel free to plug in any number you want, any number to big will automatically be set to the in-game maximum.
-Do not mess with the reserved section on the bottom unless you know for sure what you are doing, messing with it can corrupt a character.
-"Fast Travel" only lets you select what regions a character has been to, useful for places that are long and tedious to get through. Do not add the ones at the very bottom under "Unknown", they wont register and only waste time.
-On to the good stuff, "Backpack". What you can do here is change any weapon to suit you need and add them as well as items such as heads, skins, shields, relics, etc.
-To add a weapon just copy and paste the codes from the other pages and set them to your characters level with the "Sync All" button on the right of the top menu.
weapon details
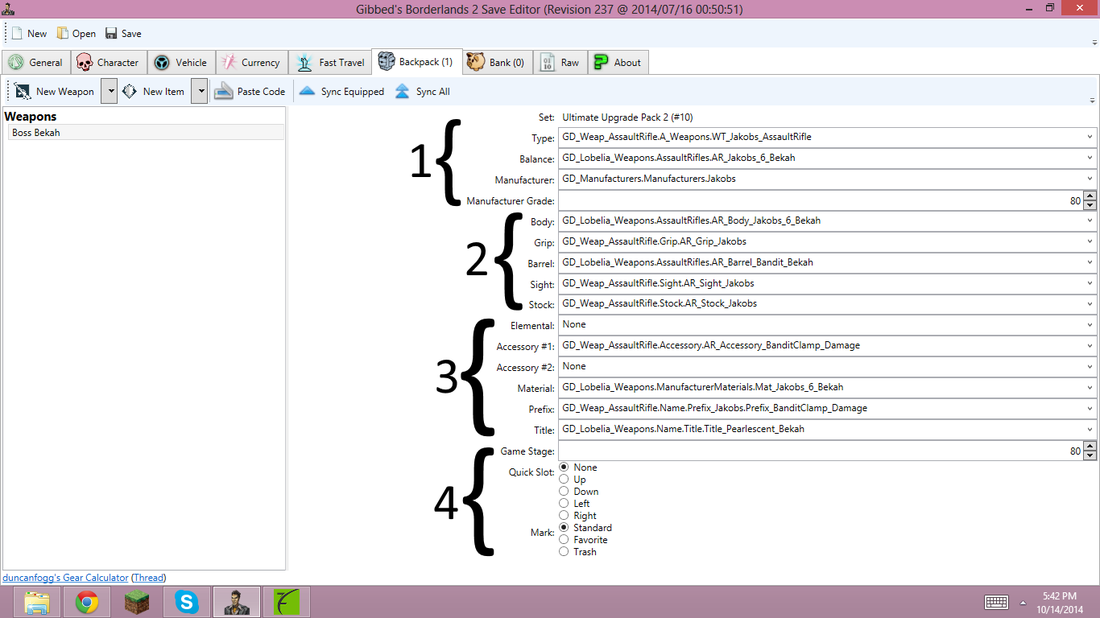
1:
These things are basically the parts that give the game a rough idea of what the gun is and what it should do. Do not mess with these as it can corrupt some weapons and dont do anything we require accept for "Manufacturer Grade" if this and the "Game Stage" the weapon will be that level.
2:
These are the parts you can see in game such as barrel, sight, grip, etc. Any gun can be made of any parts but most legendaries require a certain setup. For example, the Bekah I have highlighted has the barrel GD_Lobdelia_Weapons_AssaultRifles.AR_Barrel_Bandit_Bekah, that is the barrel that gives the Bekah its unique effect. Anything else will make it a random weapon and not the Bekah. Changing the sight and stock is what I most recommend as the stock reduces recoil (Dahl provides the best) and the sight is just preference. Be sure to have every grip match the manufacturer of the gun as it will gain increased magazine size
3:
This group is the group that determines the prefix on a gun, I.E. "Miss Moxxi's Grog Nozzle" the material is the skin of the gun, leave it how it is given to you as any weapon with a changed skin will be deleted. Accessories one and two are just the attachments n a gun, for example a blade or a laser sight. Las but not least the Title is what the weapon card reads.
4:
All these are are the markings, you can favorite a gun from Gibbed if you wish to make it stand out in game. "Gamestage" also has to math the "Manufacture Grade" to do anything, as mentioned above.
Adding Weapons:
It could not be any easier, just copy the codes from the other ages and paste them into the editor, once that's done, hit the "Sync All" button. What that does is set all the "Game Stage" and "Manufacturer Grade" to your characters level on every item in its inventory.
replacing modded .sav
After you have made your .sav and overwritten the old .sav, be sure to delete your back-up and then:
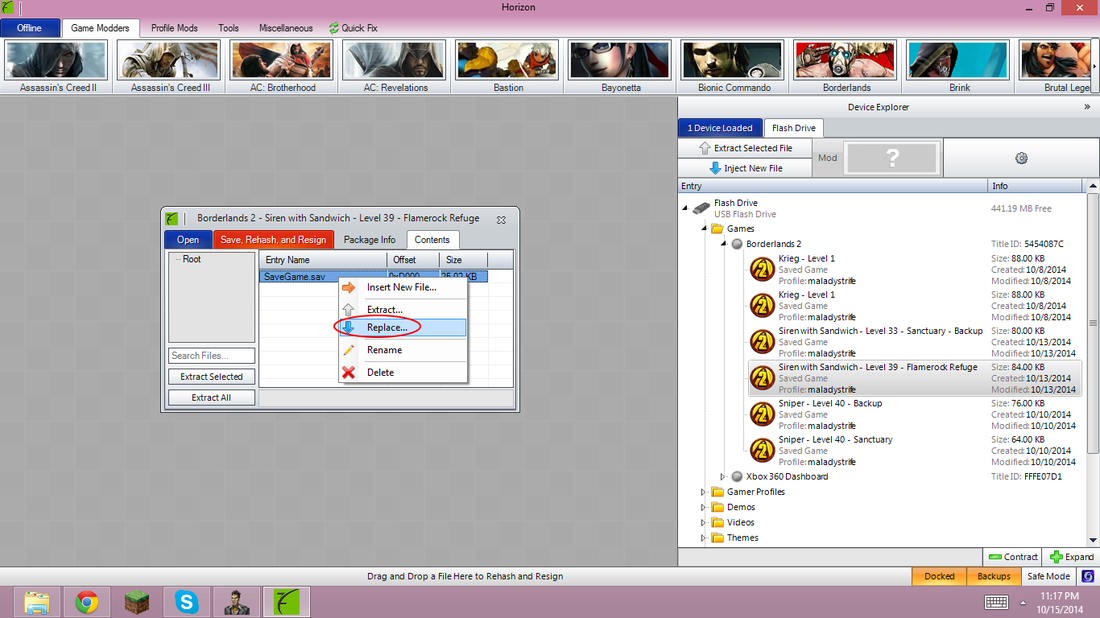
1) Double Click the .sav you wish to replace
2) Go to Contents>Right Click>Replace and select your modded save.
3) Hit "Save, Rehash, and Resign" and off you go
4) Now just put your save device in your console and play as the character, then you can move it to your hard drive after loading it in a game. For PC just ignore the moving from the flash drive and still open the save in game and continue from there.
